
July 01, 2008

Issue 001 - July 2008
Just for you in this months issue
What's New
What's new at Everything About RVing.
Featured Story
Is Now The Right Time To Buy An RV? The answer to this question might just surprise you.
It Can Only Happen To Us Section,
True stories of our sometimes weird and wacky adventures RVing. The scary part is that these stories are all true. This months story is: DAD MOM's OFFROADING In The RV Again!!!!!
Monthly RV Safety Tip
Smoke and Carbon Monoxide detector care
Independence Day Special Bonus!!!!!
Since this is our first issue of the The Gazette and it is a few days away from the July 4th celebration, we thought we would add an exclusive bonus for our readers.
If you have kids or grand kids, we have a craft project and a special recipe for you. Now the craft project is definitely for the kids, but the recipe is for anyone that would like to learn how to make some super delicious special Donut Holes.
Our grandkids have kindly volunteered to demonstrate how to complete these projects. Of course they were expertly supervised by Grammy at all times. These projects can be done whether you have an RV or not. But, of course they are a lot more fun to do when you are camping.
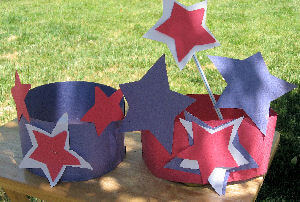
Independence Day Hat and Star Wand Project
Mini-Donut holes (our grandkids call them mini-circle donuts)
Want to share our paper with others or contribute your own article
What's New At Everything-About-RVing.com
We have added live news feeds, so you can get the scoop on what's happening now in the Wonderful World and RVing. If it's happening you will know about it. Here is where to go if you want the latest news on:
Some of these news feeds might sound similar, but believe us when we say that each news page has different stories.
The Everything About RVing RV Book Store is now open and fully functional.
We have a large variety of books and videos that you can purchase at very reasonable prices. The RV Book Store is divided up into 4 sections:
We are updating the whole look and feel of our website. Take a look at our newly remodeled homepage to get a preview of what the rest of our site is going to look like soon.
https://www.everything-about-rving.com/
If you have questions comment or suggestions Contact Us and help make Everything About RVing better
Is Now the Right Time to Buy an RV
By RVing Al
The recent skyrocketing fuel prices and the falling value of homes have impacted both RV owners and the RV Industry. In the past 7 months 2 major RV manufacturers have shut their doors permanently.
Quite a few people who recently bought new RVs at the highest monthly payments that they could qualify for are now regretting their decision to get the RV of their dreams. In other words they over bought their RV and they are now paying the price for it.
Is this all doom and gloom for RVers and potential RVers? The answer is a resounding NO! If you were ever thinking about buying an RV or upgrading to a different class of RV, now is the time to do it.
Because this is where the basic concept of Supply and Demand (also known as price and demand) you learned in your Economics class in high school kicks in. To put it in RV terms, when fuel is high, the demand for RVs goes down.
With less demand, the RV dealers are going to do everything they can to get rid of those new RVs (in other words they will accept less money for them). The high fuel prices have also caused panic amongst some current RV owners. These owners have hastily made the decision to sell their RVs because they believe that they will no longer be able to afford to use them.
This has created a buyers market for RVs. Whether you are planning to buy a new or used RV, you will be able to get a lot more for your money. Of course you are going to have to still negotiate the best price you can for what you want, but now more than ever you are in the drivers seat during these negotiations. Depending on what type of RV you are going to buy, the money you save on the purchase price could pay for your fuel for quite awhile.
In some cases you may have to finance your RV purchase. When financing, remember the finance company will give you a loan for as much as you want (based on your credit). But, just because they are going to give you that much credit does not mean that you have to use that much credit. You might believe you can afford the monthly payments. But, you need to ask yourself if you can comfortably afford the monthly RV Loan payments and still have money left over to pay for the other costs of owning an RV such as fuel, maintenance, storage and of course camping. In other words dont overbuy.
Now, lets address the concerns of the cost of going camping in your new RV. The biggest cost, depending on the type of RV you have will be fuel. This would be a major concern if you are planning a 3,500-mile cross-country trip. Now, even for the most avid RVer is not the time to spend the summer seeing the whole US (unless you have deep pockets).
Getting away from it all and camping does not require traveling 100s or 1000s of miles. Look around within a 50-, 60- or 70-mile radius of where you live and you will be surprised at all of the places there are to camp. Remember, the whole point of RVing and camping is to relax and enjoy your surroundings. I guarantee you there is no mileage limit on relaxation. Whether you are 25 miles from home or 2,500 miles from home, you can and should relax: after all, that is what the RVing Lifestyle is all about.
Our family has been RVing for 35 years, and we have been all over the US and Canada and have enjoyed every minute of it. Have we changed our RVing habits as a result of the economic crunch? YES, we are not planning to travel 1000s of miles right now. Have we given up RVing? NO, we just go camping closer to home at places we have not been to before. This change in our habits has not diminished our zeal for nor enjoyment of RVing.
You wont regret your decision about buying an RV. Just plan ahead and dont put a financial strain on yourself as this will diminish your enjoyment. More information on this subject is available on the internet.
It Can Only Happen To Us
DAD MOM's OFFROADING In The RV Again!!!!!
By Victoria Wiener (a.k.a. RVing Grammy)
Many years ago we were RVing on the beautiful Oregon Coast We had planned to go to the Oregon Dunes where we could rent ATVs for the whole family and ride them on the dunes.
When we got to the ATV rental place, the people in the office told us that they had several ATVs available. So we filled out the paperwork and got the helmets etc. I asked them if we could park our RV closer to where we would be using the ATVs and they said that we could and to just follow the signs to those parking areas. My husband (RVing Al) decided that he and the kids would stay in the parking lot with the ATVs and let me drive the RV around and find a spot to park. It sounded like a good idea at the time.
So I took off on my parking spot hunting journey. There were several signs pointing in different directions that indicated where you could park. I was not sure which area I should look at first, that's when I spotted a couple of 20 something looking gentlemen walking in the parking lot. I stopped and asked them if they knew of a good spot to park the RV. They looked at me and the RV smiled at each other and said take the road directly in front of you and go right then the second left and youll see the parking area.
All I saw straight ahead was a very soft looking narrow sand road. I asked them if I would get stuck and again they smiled at each other and said "Oh No Lady You Won't Get Stuck". In hindsight the smiles should have been a clue to me that I was being set up.
At that time we had a Class C Brougham Motor Home. So I put it into drive and headed down the road. As Im driving to the second left I noticed that the road is starting to look like really soft beach sand so I sped up a little bit
I am not feeling comfortable with the directions, and Im afraid Im going to get the RV stuck. So I finally stop and get out and notice that the front tires have dug into the sand and I also notice several motorbikes stopped behind me. The motorbike riders approached me and asked if I needed help.
I said I did and they attempted to push the RV while I had it in reverse, but we couldn't get the front tires out of the sand.
Of course my husband and kids were watching all of this from a distance in the parking lot. Their version of what they saw happen was a lot more dramatic than it actually was. I was told later that the conversation between the kids and my husband went like this.
"DAD is that even a road that Mom is driving the RV on?" "Dad is the RV suppose be driving on the dunes?" "DAD LOOK!!! Moms off roading in the RV and she's going real fast!!" "I thought Mom was going to park the RV". Dad how come Mom is stopping?" "Dad is Mom stuck in the sand?" "Dad who are all those people running towards the RV?" "Dad look they are trying to push the RV".
The kids told me afterwards that my husband never answered any of their questions, he just stood there with his eyes glazed over his mouth wide open while shaking his head back and forth.
Luckily one of the Motorcycle riders had a 4 wheel drive and easily pulled us to more solid ground. They also told us that those two good Samaritans that gave me the directions do that all the time because they like seeing people get stuck.
So our first offroading journey had begun and we hadn't even started riding the ATVs.
In next months issue I will tell you the story about riding the ATVs and what prompted this question to my husband by one of my kids "Dad how come Mom is coming down that hill backwards on the ATV?".
Until then Go Camping and create some memories.
Monthly RV Safety Tip
Smoke and Carbon Monoxide detector care
Your RV's Smoke and Carbon Monoxide Detectors should be tested each month for proper operation. Hit the test button to make sure that the alarm sounds.
The batteries on Smoke and Carbon Monoxide Detectors should be replaced every twelve months. Spring is a good time of year to perform this task.
The average life-span of Smoke and Carbon Monoxide detectors is 5 years. Remember, these detectors can and will save your life as long as they are properly maintained.
Please Feel Free To E-Mail Our E-Newspaper To Anyone
If you do not have a subscription to The Everything About RVing Gazette and would like one just go to The Everything About RVing Gazette Subscription Page
If you would like to become a reporter for/or contribute articles to the The Gazette just fill out the reporter form located near the bottom of the subscription page and we will contact you.
Do you have any comments, feedback or ideas?
We would love to hear from you just reply to this e-mail
Independence Day Special Bonus!!!!!
Independence Day Hat and Star Wand Project
Star Wand
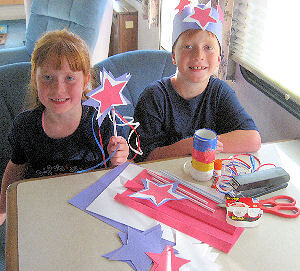
Our Grandkids enjoying 4th of July crafts in the RV
Prep Time: 15 min
What you need:
2 pieces of red, white, and blue construction paper
Red, white, and blue ribbons
glue stick or tacky glue
scotch tape
straws
Instructions:
For each Star Wand you will need to cut two each of red, white and blue stars, each a little larger than the first.
1. Cut two red stars using your red construction paper 3-4 inches in size.
2. Cut two white stars slightly larger 4-5 inches.
3. Cut two blue stars slightly larger 5-6 inches.
4. Use your glue stick to glue together the red star to the white star. Then glue the blue star on the back of the red and white star. Now you should have a red, white and blue star all a little larger than the red one stacked on one another. Now allow the glue to dry, then repeat for the second star set.
5. Once the glue has dried on the two sets of stars, place your straw in the middle of the star and tape it to the back of you larger blue star. Then glue the two sets together, and allow to dry.
6. Finish the star wand by taping a 15 inch piece each of red, white, and blue ribbon around the straw. Enjoy!
Additional Tips:
You can also use a pencil or ½ inch wooden dowel instead of the straw. Dont have construction paper? Then try using a piece of cardboard to cut the stars and for a different look cover them with tinfoil, or use plastic from a milk carton for the stars. Felt and craft foam will also work to make the stars. Just use your imagination and have fun!
Independence Day Hat
Prep Time: 30 minutes
What you need:
Scissors
Glue stick or tacky glue
Scotch tape
Double-sided tape
Stapler
Instructions:
For each hat you will need to cut two each of red, white and blue stars, each a little larger than the first.
Stars
1. Cut two red stars using your red construction paper 3-4 inches in size.
2. Cut two white stars slightly larger 4-5 inches.
3. Cut two blue stars slightly larger 5-6 inches.
4. Use the glue stick to glue together the red star to the white star. Then glue the blue star on the back of the red and white set. Now you should have a red, white and blue star all a little larger than the red one stacked on one another. Allow the glue to dry and place on the hat band.
Hat Band
1. To make the headband start with a piece of construction paper, Fold in half length ways and cut in half. Now fold each piece of paper 1 inch length ways and connect the two pieces end to end to make one band.
2. Run a piece of scotch tape on the fold the length of the band for added strength.
3. Place the folded band around the forehead and measure the band to fit, overlapping the ends.
4. Then staple the band to make the base of the hat band.
5.Glue the set of stars to the hat band and Enjoy!
Additional Tips:
You can also use red, white and blue stars separately, or just red and white, or blue and white, etc. For a different look you can tape the stars to one end of the straws and then tape the straw to the hat band, or use pipe cleaners. Felt and craft foam will also work to make the stars and the hat band. Have Fun!
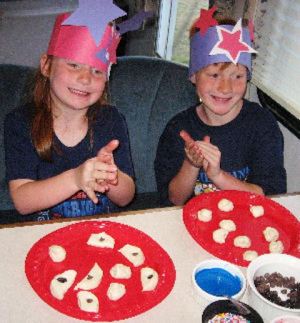
Mini-Donut holes (our grandkids call them mini-circle donuts)
"R" Kid Chefs"
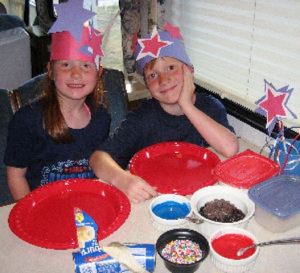
Our Grandkids Ready To Make Mini-Donut Holes
For years our family has enjoyed the biscuit donut holes. Our Grandkids like to call them Mini Circle Donuts, and like to add a special surprise in the centers. They are very easy to make.
Prep Time: 15 min
Makes 20 Servings
Supplies:
Small Frying Pan, 2 cups of Cooking Oil, spoon with slots so the oil can drain, knife, fork, small plastic container with lid, a couple of paper towels or napkins, and a can of refrigerated biscuits (any kind will do, I use the small cans, they cook faster).
For the powder coatings on the mini donuts you will need 1 ½ cups of confectioners powdered sugar and for the Cinnamon coating you will need 1 cup granulated sugar and 1 heaping teaspoon of cinnamon.
For the surprise center fillings you will need chocolate chips, M&Ms, raisins. etc.
For the holiday frosting you will need red food coloring, blue food coloring and candy sprinkles.
Suggested Coatings (pick one or two or use them all)
Powdered Sugar Coating: In a small plastic container with lid (4 ½ X 6 ½ x3) add confectioners powdered sugar, set aside.
Cinnamon Sugar Coating: in a small plastic container with lid (4 ½ X 6 ½ x3)
add granulated sugar and Cinnamon and mix until well blended, and set aside.
Sugar Frosting: Mix ½ cup confections powdered sugar, 1 teaspoon of milk and
mix until a slight runny consistency is reached.
4th of July Red and Blue Frosting : In 2 separate bowls (1 for red and 1 for blue) add ½ cup confectioners powdered sugar and 1 teaspoon of milk. Now add 35 - 50 drops of food coloring. The red food coloring would make a red frosting, the blue food coloring would make a blue frosting,You may add a little more milk if needed. The powder sugar coating will take care of the White in Red White and Blue.
Candy Sprinkles: You can also fill a bowl with candy sprinkles and coat the mini-donuts with them.
Putting the surprises in the middle of the Min-Donut Holes
Prepare the biscuits: Open can of biscuits and place on a dish. Separate all biscuits and cut biscuits in half. If you are planning to put surprises in the middle of the Donut Holes now is the time to do so. Put your M&Ms, Raisins etc. in now. Pinch the sides of the biscuits to hold the surprise in the middle and roll them up into mini circles.

Caution: This next step should be done by an adult
In a small frying pan heat oil over medium heat to about 350 degrees. Cooking time will vary depending on the heat of your oil. Drop 7-10 of the biscuits circles into the heated oil. Make sure once you start frying the biscuits holes you dont stop. They will burn very quickly if you walk away. After 1-2 minutes, or golden brown turn the biscuits, cook to other side and remove when golden brown, and place on a paper towel.
Now the kids can finish the rest
In a minute or two when mini donuts are cool to the touch place 4-5 donut holes in plastic container with the sugar and/or Cinnamon Coating and shake 3 to 4 times until completely covered. Remove from plastic container and place on a dish. Repeat the process until all mini donuts have been coated with the sugar.
Dip mini donuts into the frosting mixture or use a fork and let the frosting drizzle over the mini donuts they can now be dipped in the candy sprinkles if desired. Enjoy!
Thanks for reading our paper and Happy RVing!!!!
Copyright 2008 Everything About RVing
All Rights Reserved